Hi , I hope everyone had a great time celebrating ❤️Valentine's Day/Week. If you're still in the spirit, consider these activities with your students. Make a👾 PixelArt design or try this 💟Paper Heart Project by Howie Hua. When you sign in let me know what you've been having success🌟 with and challenges. I love to hear from you and brainstorm solutions. 🎟 The passcode is 2024PLEASE SIGN IN! I respond ☀️ What Is Up This Week-
🖊️SIGN IN with the passcode 2024
-
📅 Be added to the events calendar for the week. (do this every week!)
- 🔺 Premium Add-on: Install Audience Participator by Alice Keeler
Audience Participator Video Tutorial Hear from all students! Then discuss! 4.💧🆕Drip Workshop-One Lesson Per Week (online course) Template Tab Drip Workshop 5..☑️Check alicekeelermembership.com with passcode 2024 for resources & events. 6.⏺️ Webinar Recording with Alice: How to Make a Google Apps Script Add-on 7.⏺️ Webinar Recording with Alice: Version History-Your Bestest Friend with Google Apps
8.✅ Check out: Which One Doesn't Belong ? -Increase engagement and DOK!  🌟Premium Event This Week✴️ Office Hours with Marcia MENTORS: Friday 9am-9:30am PST Join Google Meet
 Add 📹YouTube Videos to Google Forms Add 📹YouTube Videos to Google Forms
📂Open a Google Form form.new 🎥Add YouTube videos that aren't tied to questions 🖱️Simply click on the 5th icon in the Forms toolbar 🦩Enhance your Forms with dynamic and informative multimedia 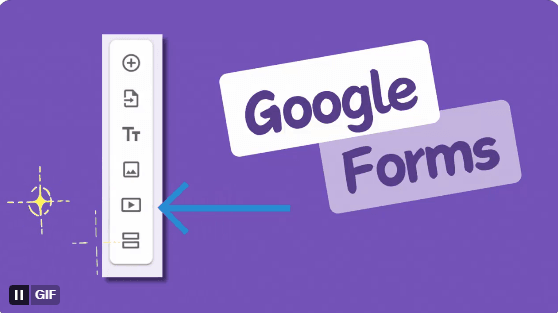
 How to 🔒Lock Areas of a Google Doc📄 How to 🔒Lock Areas of a Google Doc📄
❓I get asked this quite frequently. You assign each student a Google Doc™, how do you lock them from editing PARTS of it? The short answer is you can not. However, if you follow these steps for my hack you can essentially do exactly this: how to lock areas of a Google Doc. 
🏃♂️Quick Steps: How to 🔒Lock Areas of a Google Doc- Create a Google Sheets spreadsheet
- Turn on word wrap for the entire sheet.
- Increase or Decrease columns widths
- Use border tool to create answer boxes
- Highlight protected regions
- Use the Data menu to protect the range
- Use the View menu to remove gridlines
📗Why Lock Parts of Google Doc?There are many good reasons you may want to lock editing on parts of a Google Doc. View only documents lock the entire thing. Edit access provides access to the entire document, including the editing of questions. ✏️If you want students to respond to a particular prompt then you want them to answer the prompt but not edit the prompt. For a document that asks students to update their responses you may want them to only update a previous response or to answer a follow up question without editing the previous responses. 📒Google Workspace EditabilityThe Google Workspace apps of Docs, Slides, Forms, and Sites do not offer the opportunity to restrict editing on parts. The only tool you can lock out PART of the document from editing is Google Sheets. Which is great news since “The answer is always a spreadsheet.” 📙Turn Google Sheets Into a Google DocFor many circumstances a Google Sheets spreadsheet can mimic a Google Doc. Sometimes, it has improved advantages over a Google Doc. Google Sheets DOES have the capability of locking PARTS. Formatting a Google Sheets to look like a Google Doc is the trick. While this may appear to be multiple steps, you will get the hang of it quickly. 📑Consider the Grid to Lock Areas of a Google DocConsider which parts of your “Google Doc” that you want to lock. You will want a cell for this locked area. 🖨️Consider the Print AreaUse Control P to print a Google Sheets spreadsheet. Set the settings in the sidebar to be “Portrait.” Default is “Landscape.” The default is also “Fit to width. While your content will fit automatically, to ensure it looks like the intended Google Doc refrain from adding content that is not visible on the screen. 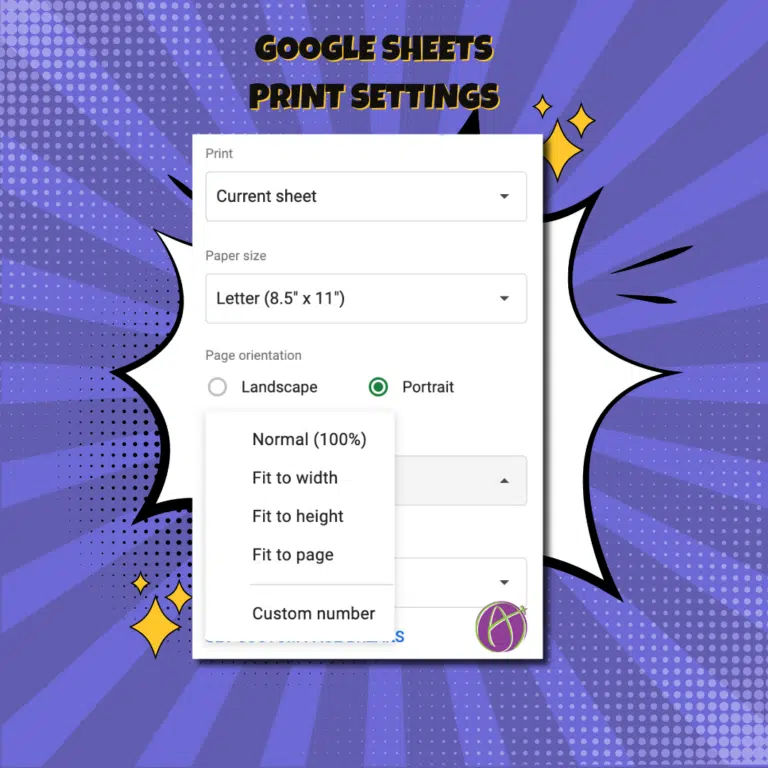
🔄Set Word WrapBy default, a Google Doc has word wrap set. The key to loving using Google Sheets is word wrap. Sheets defaults to the text spills into the next cells. If there is content in the next cells the text gets cut off and hidden. This is easily solvable by clicking on the “awesome box.” This selects all. 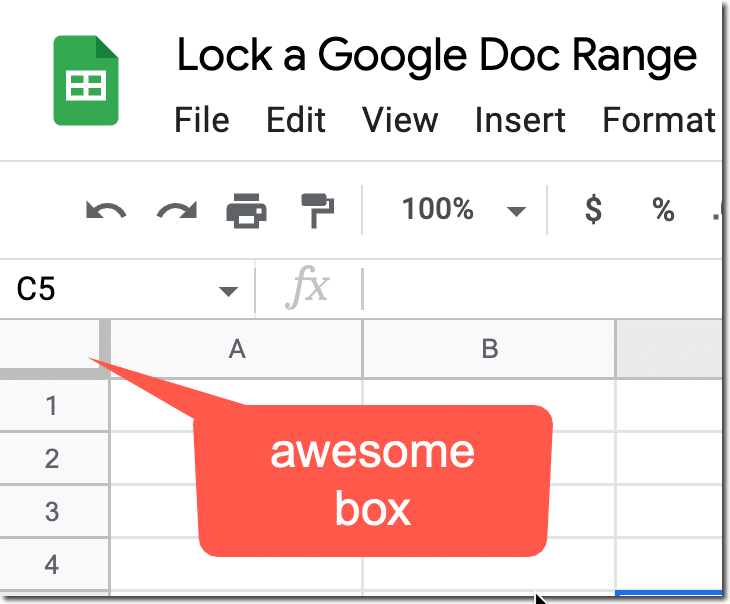
🧰Wrap Icon in the ToolbarAfter selecting all of the cells, click on the word wrap icon in the tool bar. This is located by finding the centering icon. To the right of centering is to center vertically (which is suggested to do as well). To the right of that is the word wrap icon. Click on the tiny triangle to select the middle option, wrap. 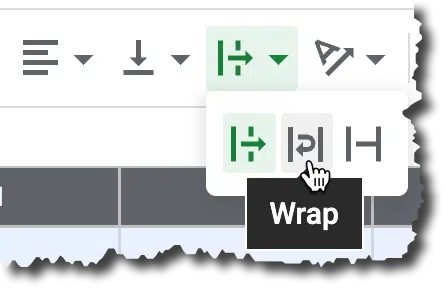
📏Adjust Column WidthsGet your mouse in between the column indicators to increase the width of the individual cells. When the mouse changes from a pointer arrow to a flat arrow. Hold down with the mouse to drag the column width either smaller or larger. 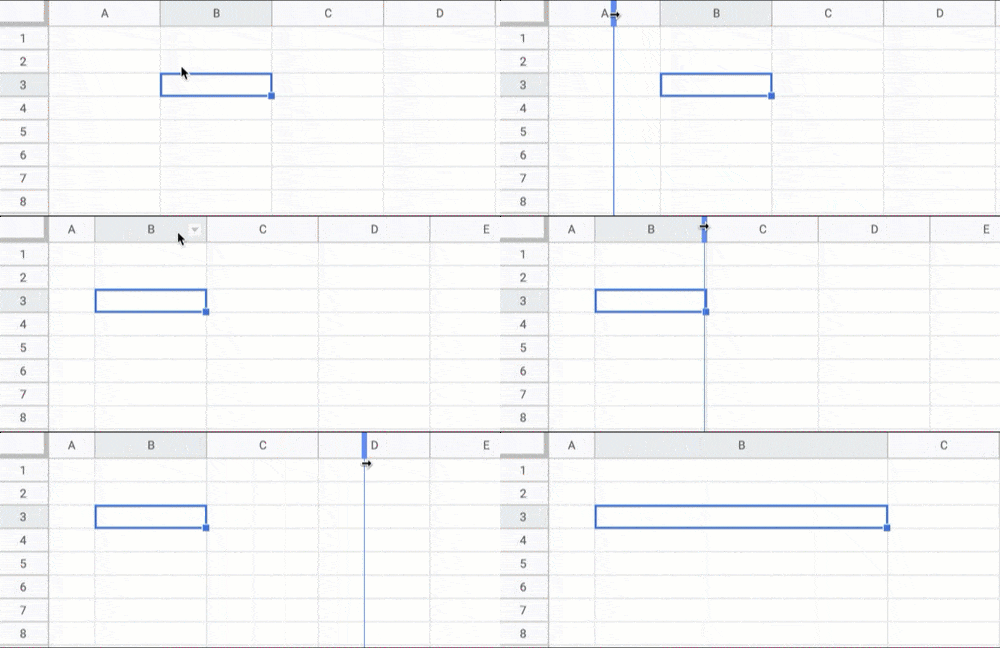
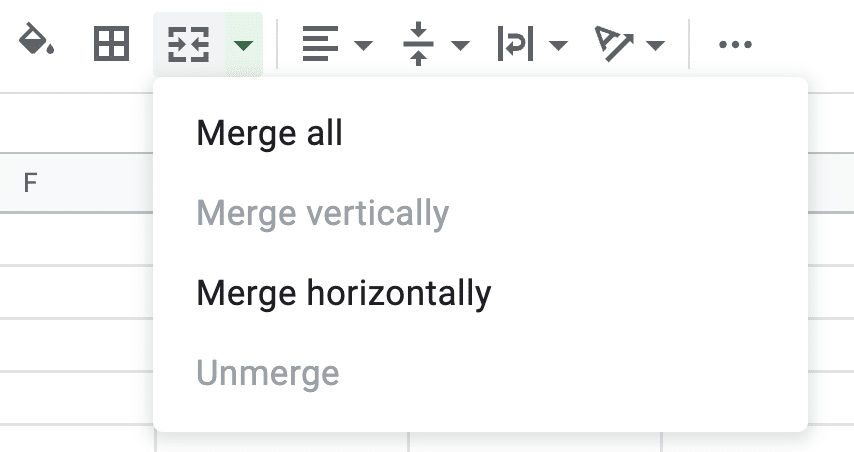
✅Enter ContentWhat is the information you are entering into your Google Doc? Arrange this on the Google Sheet. You do not need to worry about page width so long as you can see the text on your visible screen. 🆗Merge CellsThere are circumstances where it is helpful to merge cells together to achieve the same layout of the Google Doc. Highlight multiple cells and click on the merge icon in the toolbar. 👍You can locate the merge icon by locating the paint can in the toolbar. Paint can, borders tool, and then the merge tool is a broken square with 2 arrows pointing in. This allows you to create LARGE blocks of text.
🎨Create Answer BoxesThere are areas of the document you want students, or users, to enter text. Identify those ranges. It may be helpful to use the border tool in the toolbar to create the answer line. If you want more room to respond, you may want to increase the row height. On the left edge of the spreadsheet hover your mouse between the two row indicators until the pointer arrow changes. Hold down your mouse and drag to increase the row height. 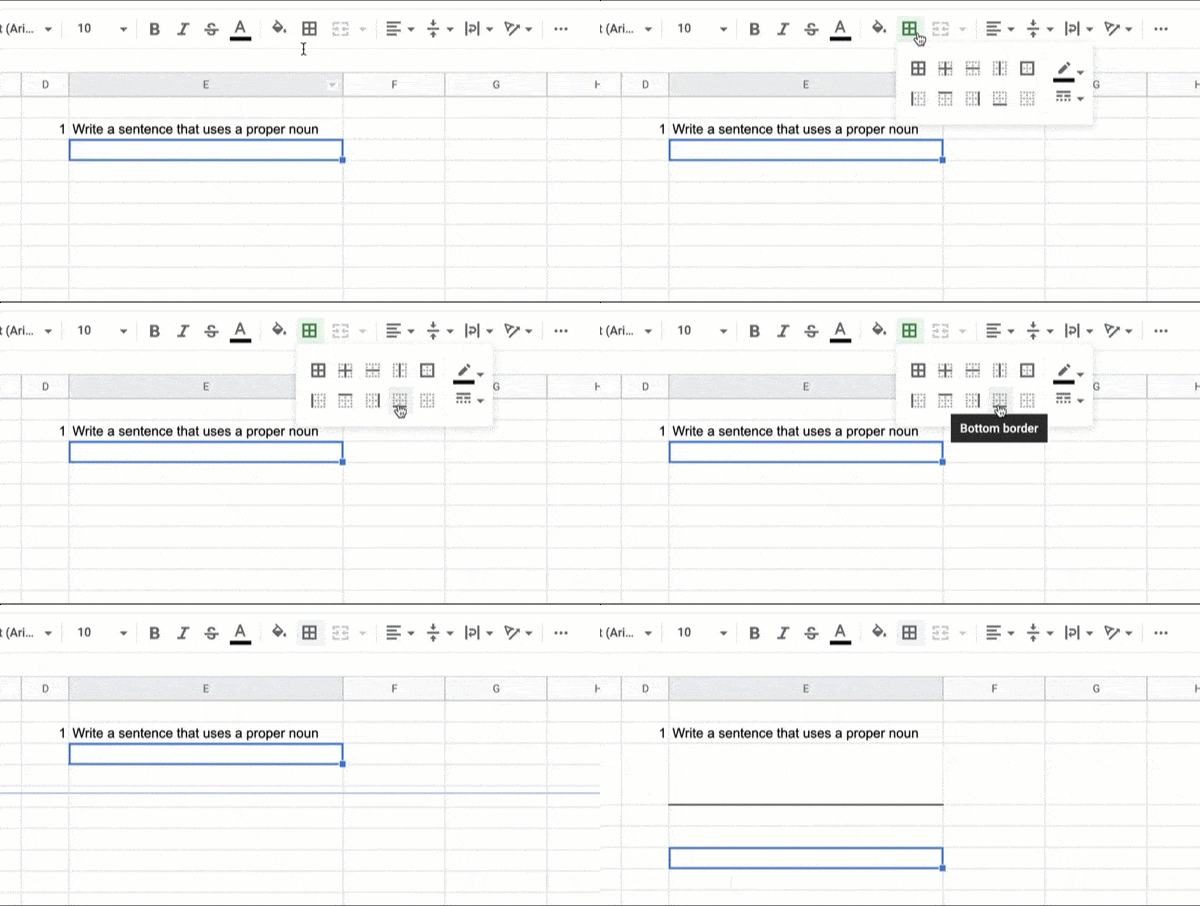
🔐Lock the RangesThere are a couple of ways to lock editing on certain cells. ✋Protect SheetOn the sheet tab, click on the tiny triangle. Select “Protect sheet.” This will bring up a sidebar. Check the checkbox for “Except certain cells.”List the range of cells that ARE allowed to be edited. 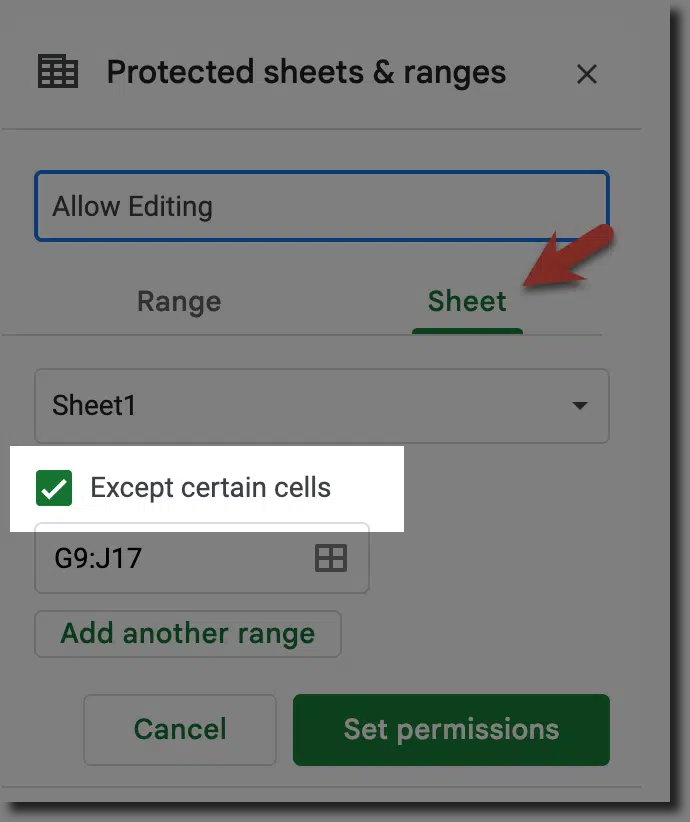
🆘If you use Google Classroom to make a copy per student the student is the owner of the spreadsheet and can not be locked out of editing.
🚩Protect RangeIf you only want to lock down a few parts of the Google Doc in Sheets, protect the range instead. Highlight the cells that you do NOT want edited. Right click to select “Protect range.” Set the permissions to be “Only me.” 🆘For teachers: To lock the range of multiple spreadsheets will, to be honest, challenging. Use my SheetPusher Add-on to facilitate this. 🙈Hide GridlinesThe real trick to disguising your spreadsheet as a Google Doc is to remove the gridlines. Use the View menu to select “Show” and uncheck “Gridlines.” This will create a solid white document that looks like a Google Doc. 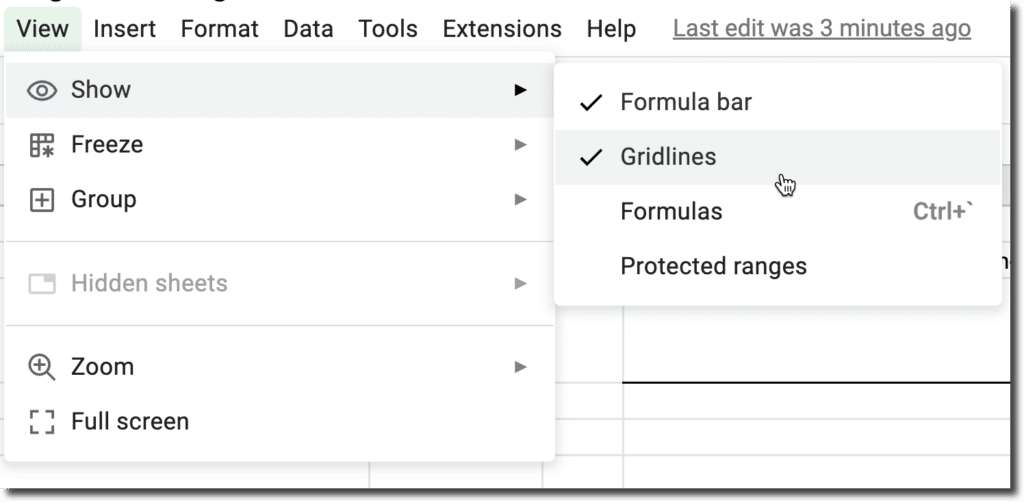
Recent Blog Posts - February 8, 2024: 5 Hidden Features in Google Forms
- February 6, 2024: It's Time - Switch to Pageless in Google Docs
- January 30, 2024: Sheet Streamer - Copy to Other Sheets
- January 17, 2024: Your AI Rubric Stinks
- January 16, 2024: What Is Wrong with This AI Lesson Plan?
- January 15, 2024: Honoring Martin Luther King Jr.: The Journey Towards Equity in Education Continues
- January 11, 2024: Join Alice Keeler, Google Developer Expert, on the New Season of Totally Unscripted
- January 8, 2024: Can Schools Offer Work Life Balance?
- January 2, 2024: Official Pixel Art Add-on for Google Sheets
- December 30, 2023: Transforming Classrooms: Teaching with Google
- December 22, 2023: 10 Google Docs Add-ons for Teachers
- December 19, 2023: 10 Hidden FigJam Whiteboard Gems
| 